How to Remove Unused CSS in WordPress (The Right Way)
Do you want to remove unused CSS in WordPress so your site will load faster?
Unused CSS is any CSS code added by your WordPress theme or plugins that you don’t really need. Removing this CSS code improves WordPress performance and user experience.
In this article, we’ll show you how to easily remove unused CSS in WordPress without breaking your website.
What is Unused CSS in WordPress?
Unused CSS in WordPress is CSS code that loads on your website but isn’t actually needed in order to display the page.
The extra code can make a visitor’s browser take a bit longer to render a page, which creates a bad user experience. The slower loading times can even affect your search rankings, resulting in less traffic to your site.
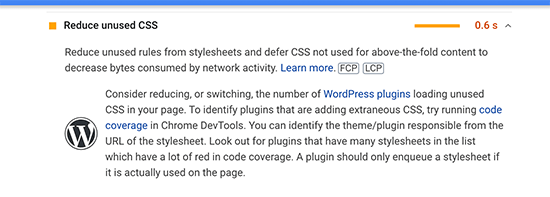
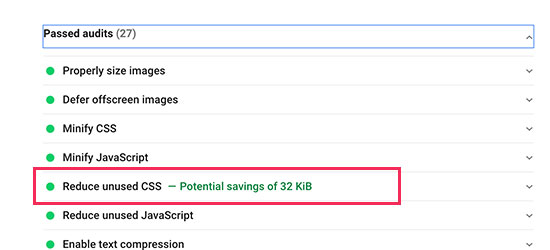
You can see how unused CSS code is affecting your website by using Google Pagespeed Insights. It will show you a section titled ‘Remove unused CSS’ with details of which CSS files are affecting your loading times.
Why Is Unused CSS Added in WordPress?
CSS is used to style the appearance of your WordPress website. Your WordPress theme includes CSS, with most of it included in a single style.css file.
In addition to your theme’s CSS, your WordPress plugins will also load their own CSS. For instance, WooCommerce will load CSS to display products, a page builder plugin will add its own CSS to display your custom pages, and a form builder plugin will include CSS to style your forms.
Then, you have your web fonts, icon fonts, and other elements that will need to add their own CSS files as well.
Usually, these files are very small and load quickly. However, if your WordPress site has a lot of them, then the effects can add up and have a noticeable impact on your site speed.
How to Remove Unused CSS in WordPress?
There are a few different ways that you can reduce unused CSS on your WordPress website.
However, it would be quite a difficult task to completely remove all unused CSS in WordPress. Because of the way WordPress works behind the scenes, some unused CSS may be hard to find and remove.
That said, we’ll show you two methods to remove unused CSS, and you can choose the one that works best for you.
Method 1. Remove Unused CSS in WordPress using WP Rocket
This method is easier and is recommended for beginners. It greatly improves the overall delivery of CSS files on your WordPress website, including removing most of the unused CSS.
We think it is the best solution for beginners because it is easier and achieves the main goal of providing a better experience for your users. This means your website loads fast on speed testing tools and also feels fast to your users.
First, you need to install and activate the WP Rocket plugin. For more details, see our step by step guide on how to install a WordPress plugin.
Upon activation, you need to visit the Settings » WP Rocket page and switch to the ‘File Optimization’ tab.
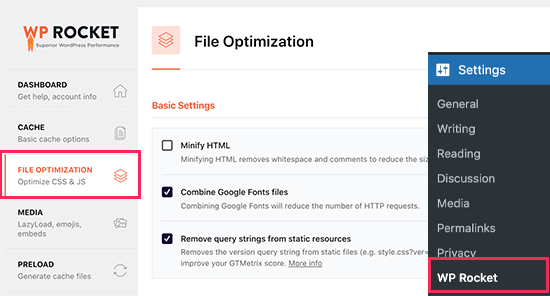
Next, you need to scroll down to the CSS files section. From here, you need to check the box next to the ‘Optimize CSS delivery’ option.

This option generates a CSS file that only contains the CSS code needed to display the visible part of your website. It loads that file first, displays the page to your visitors, and then loads other CSS files using a technology called deferred loading.
By removing this render-blocking CSS, your website becomes viewable to users much more quickly than it would if you had to load all the CSS files before the page is displayed.
After enabling the ‘Optimize CSS delivery’ option, click the Save Changes button and wait for WP Rocket to generate the necessary CSS file for all your posts and pages. It will also automatically clear the cache for your website.
Once finished, you can go ahead and test your website performance again using Google Pagespeed Insights.
Additional File Delivery Tweaks to Boost Performance
WP Rocket also allows you to remove query strings from static files, combine Google Fonts files, and minify HTML. All of these tweaks add tiny improvements to your overall speed, which add up to a faster loading experience for your visitors.
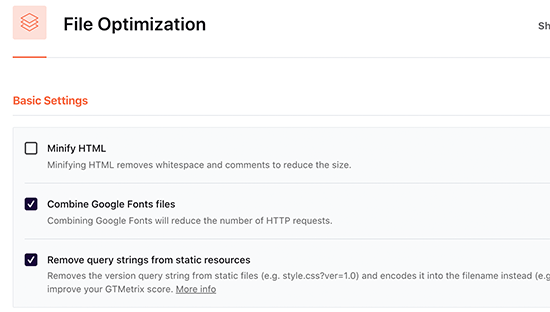
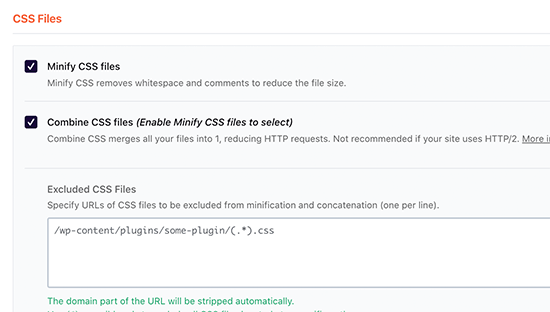
You’ll also see options to minify and combine CSS files. These options will reduce HTTP requests and give you an additional speed boost.
However, you’ll need to carefully check your website to make sure that nothing is broken after enabling these settings.
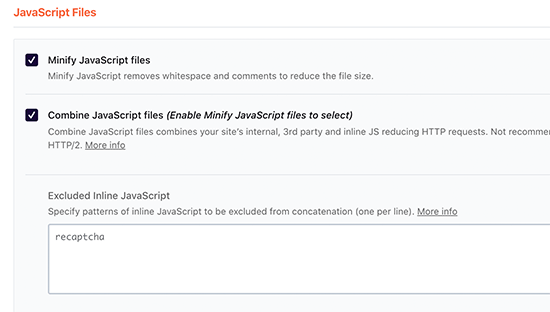
Additionally, you can apply the same optimization for JavaScript files on your website. You can minify and combine them to serve as a single file and defer loading for JavaScript files to improve performance.
For more details, see our step by step tutorial on how to properly setup WP Rocket in WordPress.
Method 2. Remove Unused CSS in WordPress using Asset CleanUp
This method is a little advanced but incredibly powerful and will let you easily remove any unused CSS from any page of your WordPress website.
However, it is a bit complicated and you will need to test your website functionality and appearance thoroughly to make sure nothing is broken.
First, you need to install and activate the Asset Cleanup plugin. For more details, see our step by step guide on how to install a WordPress plugin.
Upon activation, you need to visit the Asset CleanUp » Settings page and switch to the Test Mode tab. From here, you need to turn on the ‘Enable Test Mode’ option.
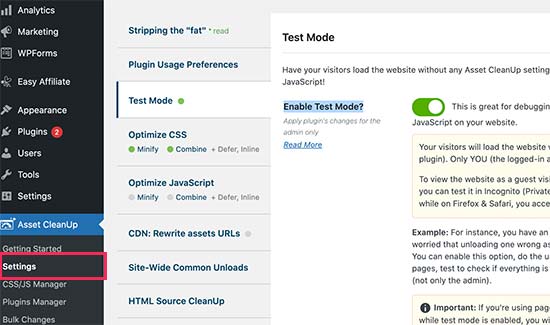
This allows you to try out different settings and test them as an administrator without affecting website visitors.
After that, you need to visit the Asset CleanUp » CSS/JS Manager page. From here, you can unload unwanted CSS and JavaScript files on a page by page basis.
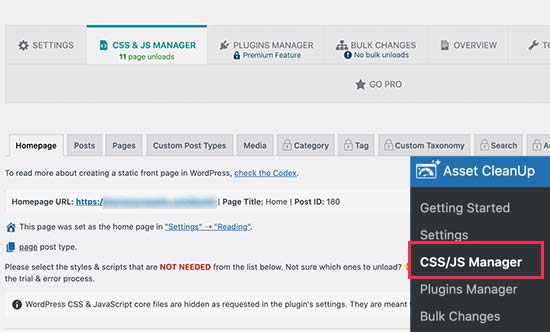
It will first fetch your homepage and will show you all the CSS and JavaScript files loaded on that page.
You need to scroll down and review the loaded files. If you see a file that you don’t need, then you can unload it for that particular page, post type, or sitewide.
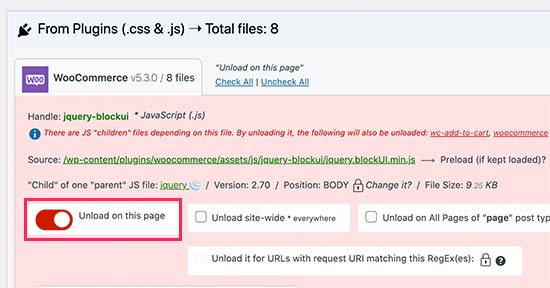
The plugin also allows you to choose specific posts or pages from here, or you can access the same options by editing the post or page as you normally would.
On the post edit screen, you’ll find the Asset CleanUp box just below the post editor.
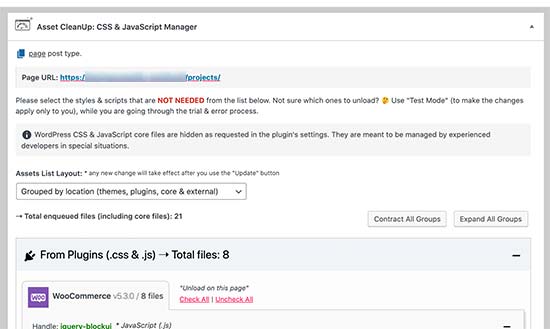
The plugin will automatically fetch and list all the files and assets loaded when a visitor views this page on your website. You can then simply unload the unused CSS or JavaScript files that you don’t need on that page.
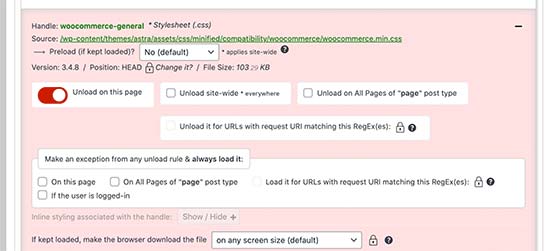
Important: Don’t forget to test your website after removing any unused CSS or JavaScript to make sure that everything is working fine.
Once you are done unloading and removing unused CSS and JavaScript files, you can go to back to the plugin’s settings page and switch off the ‘Test Mode’.
Don’t forget to click on the Update All Settings button to store your changes.
You can now test your website using Google Pagespeed Insights to see the change in the unused CSS notice.
We hope this article helped you learn how to easily remove unused CSS in WordPress. You may also want to follow our complete guide on how much does it cost to build a website, and check out our list of the best managed WordPress hosting.
If you liked this article, then please subscribe to our YouTube Channel for WordPress video tutorials. You can also find us on Twitter and Facebook.
The post How to Remove Unused CSS in WordPress (The Right Way) appeared first on WPBeginner.
source https://www.wpbeginner.com/wp-tutorials/how-to-remove-unused-css-in-wordpress-the-right-way/
Post a Comment for "How to Remove Unused CSS in WordPress (The Right Way)"
Comment when there are difficulties