Everything You Need to Know About IP Addresses on Ubuntu
Don’t know how to find your system's IP address in Ubuntu? No problem. In this guide, we’ve covered everything related to IP addresses in Ubuntu for you. Apart from learning about IP addresses, we'll also discuss how to find your system IP address along with a guide on setting a static IP address in Ubuntu.
So, let’s get started.
What’s an IP Address?
We are going to use a few terminologies in this article, including words like IP address, static IP address, dynamic IP address, IPv4, IPv6, etc.
And it’s important that you know what these terms mean, so that you know what you are actually doing, instead of just following random instructions. Don’t worry, you don’t have to memorize anything. You can just scroll back here if feel you don’t get the gist of what’s going on.
If you are already aware of these terms, then no worries; you can just skip to the next section. But first, let’s start with the IP address.
An IP address is a unique number that identifies your computer on the internet. Think of it as your home address. Just as people can reach you by knowing your house address, other devices on a network can send and receive information to your system using an IP address.
Types of IP Addresses
There are two kinds of IP addresses currently in use: IPv4 and IPv6.
The IPv4, short for Internet Protocol Version 4, is the technology that connects your devices to the internet. It uses a 32-bit address which consists of numbers 0 to 256, separated by the period (.) character. For example, the IP address for MUO is 54.157.137.27. Other devices and networks recognize MUO through this address.
IPv6, on the other hand, is a recent improvement over the IPv4 address. While IPv4 uses a 32-bit address, the IPv6 has a 128-bit address space, letting it produce 340 undecillion unique IP addresses. The IPv6 was introduced to save us from the scarcity of unique IPs, as the number of devices connected to the internet keeps increasing by the day.
There's another way to categorize IP addresses, i.e. on the basis of whether it's Static or Dynamic.
If you have a Static IP address, it means that the IP address of your device will always remain the same. In other words, every time you connect to the internet, your IP address will be the same, as the one in your previous session. So, if yesterday your IP address was, say, 25.124.172.12, then it will be the same today as well.
If your IP address is set to Dynamic, however, it will be subject to change. Dynamic Host Configuration Protocol (DHCP) servers are responsible for assigning dynamic IP addresses. Most devices on the internet---and most probably yours too---use the dynamic IP address because they are the most cost-effective option.
Finding IP Address in Ubuntu via the Command Line
Now that we know the basic terms associated with IP addresses, let's get down to how you can actually go about finding your IP address in Ubuntu. Broadly, there are two ways to do the same. The first one uses the Ubuntu command line.
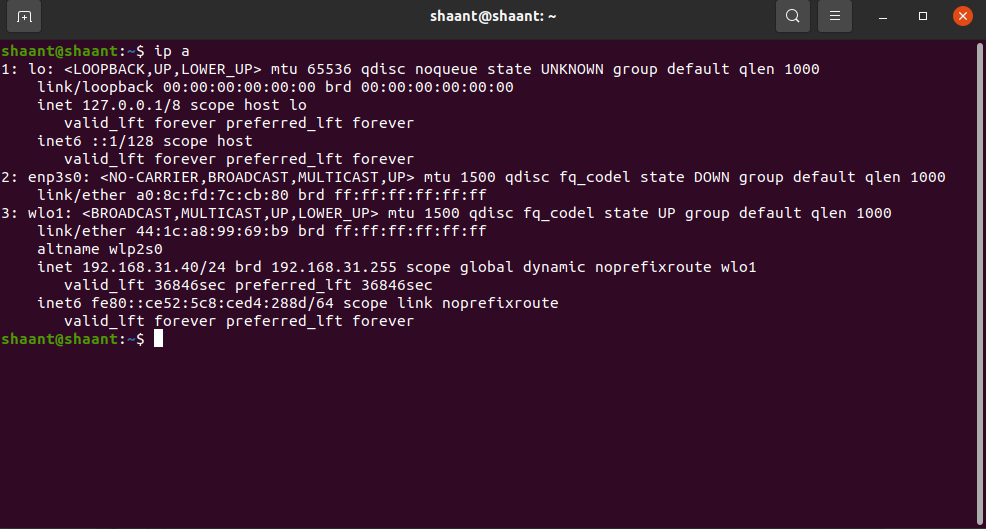
To find your IP address in Ubuntu, type this simple command in your terminal:
ip aThis will show you your assigned IP address. Moreover, it will also show you the MAC address.

Note: The MAC address is a unique identifier assigned by the manufacturer to network hardware. It basically helps your device stand out from every other device on a network. And yes, it's different from the IP address.
Alternatively, you can also use the ip addr show command. This command will also display the IPv4 and IPv6 addresses of your Ubuntu machine.
And that’s it. Super easy, right?
Finding Your IP Address Using GUI
We totally understand if you are not into the command line; a lot of people aren’t. However, we have come a long way from the early days of Linux, when you just had to deal with the crappy text-based user interface to work with any of the Linux distros.
Now, most of the Linux distros have a simple GUI that you can use to navigate and control the operating system. This means that you can still find your IP address in Ubuntu through a simple graphical interface, or in this case, GNOME.
If you have a wired internet connection, follow the steps below to proceed:
- Open up Settings from the Applications menu.
- From the left tab, click on Network. Finally, select the Settings icon under the Wired section.
Your IP address will be now visible to you.

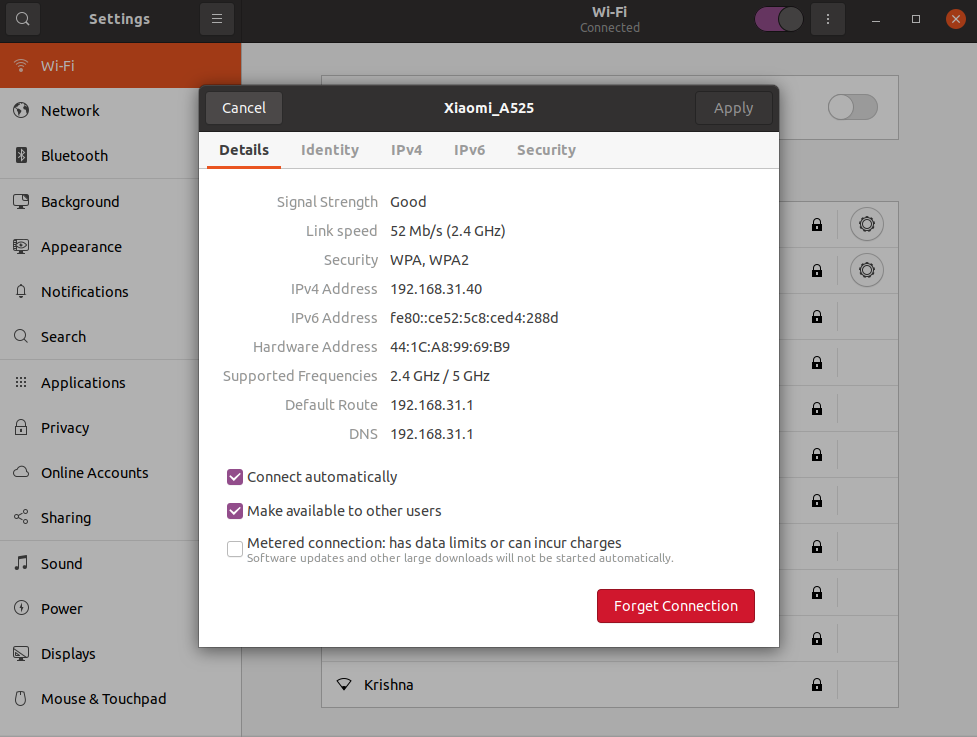
However, if you are using a wireless connection, select the Wi-Fi option from the left sidebar, and then click on the Settings icon of your network. A pop-up with your system's IP address will be displayed on the screen.
How to Set Static IP Address in Ubuntu
Since most devices on the web are set to a dynamic IP address by default, your device will also most probably be set to a dynamic one. To configure it to a static IP address, you first need to tweak your network settings.
For that, you will have to use Netplan, a tool used to configure networks on a Linux system. You will find the Netplan configuration files in the /etc/netplan directory.
Open the YAML configuration file in the terminal using your preferred text editor. We will be using nano in this guide.
sudo nano /etc/netplan/01-netcg.yamlNow, make the changes to your network interface name. Simply copy the code below and paste it in the configuration file to set your IP address as static.
network:
 version: 2
 renderer: networkd
 ethernets:
 ens3:
 dhcp4: no
 addresses:
 - 192.168.121.199/24
 gateway4: 192.168.121.1
 nameservers:
 addresses: [8.8.8.8, 1.1.1.1]
Note that you have to add the IP address you want to use in the addresses and gateway4 section.
To save your file, run the following command:
sudo netplan applyVerify the changes using the ip addr command:
ip addr show dev ens3
Set Static IP Address in Ubuntu From GUI
If you're not a fan of the Linux command line, you can set a static IP address graphically in Ubuntu as well.
- Go to the Settings of your Ubuntu system.
- If you are using a wired connection, click on the Network button. Those who have a wireless connection, select the Wi-Fi option from the list.
- Then, click on the Gear icon next to your network connection.
- After you click it, a dialog box will pop up. From there, select the IPv4 tab to start setting up the static IP address.
- Now, set the IPv4 Method to Manual. Enter the Gateway, Netmask, Static IP, and DNS, and then click on Apply.
That’s All About IP Addresses in Ubuntu!
We covered how you can find your system's IP address using the terminal and a GUI, as well as how you can add a static IP address. Hopefully, this article helped you learn everything about IP addresses in Ubuntu. But don't stop now, as there's a lot more to learn about IP addresses and networking, in general.
Most of the devices connected to the internet communicate with each other using the OSI Model. OSI or the Open Systems Interconnection Model is a global standard that forms the base for data communication processes over the internet.
source https://www.makeuseof.com/ubuntu-ip-address/
Post a Comment for "Everything You Need to Know About IP Addresses on Ubuntu"
Comment when there are difficulties