A Step by Step Guide to Installing Apache Tomcat 9 Linux
Apache Tomcat is an open-source web server and servlet container for running Java applications. It is the most popular application server used with Java web applications. There are 100s of companies including eBay, Alibaba, and MIT using it.
This tutorial is a step-by-step guide to download Tomcat 9.0.45. The code here was tested on Debian 10. That means that if you’re using any Debian-based distro like Ubuntu or Kali Linux (or Debian itself), you can follow through.
Prerequisites for Apache Tomcat 9
You need to be a user with sudo privileges. If you are not a sudo/root user, you can do as follows to get that user privilege:
Login as root and in your terminal enter the following command:
$ adduser newuserYou will be prompted to give a password. Ensure that it is strong and secure. You will also be asked for additional info like your name and telephone number. This is optional and trivial. You can just press the enter key to skip.
b) Add the user to the sudo group
$ usermod -aG sudo newuser
You now have a sudo user called newuser.
Step 1: Install OpenJDK
To install Tomcat 9 you will need Java Standard Edition (SE) 8 or higher to be installed. Achieve this by installing OpenJDK, an open-source implementation of Java SE and Java Development Kit (JDK).
First, you will need to update our apt package:
$ sudo apt updateThen next:
$ sudo apt install default-jdkAt the time of this writing, OpenJDK14 is the latest version of OpenJDK. After the installation is complete, verify it by checking your java version as below:
$ java -versionStep 2: Create a Tomcat User
You can use Tomcat as a root user but this poses a serious security threat. Therefore, you'll need to create a new user that will run the service with a home directory of /opt/tomcat. This directory is where you will install Tomcat, created with a shell of /bin/false so that no one can log into it.
Run the command below to do this:
$ sudo useradd -m -U -d /opt/tomcat -s /bin/false tomcatStep 3: Install Tomcat
The official binary distribution of Tomcat can be obtained from the Tomcat download page.
You can use the wget command to download the Tomcat zip file to the /tmp directory, a temporary folder location.
$ cd /tmp
$ wget https://mirror.kiu.ac.ug/apache/tomcat/tomcat-9/v9.0.45/bin/apache-tomcat-9.0.45.tar.gz
If you have issues with using wget, you can optionally use the curl command to download Tomcat. First, download curl:
$ sudo apt install curlThen use curl with the link you got from the Tomcat website:
$ curl -O https://mirror.kiu.ac.ug/apache/tomcat/tomcat-9/v9.0.45/bin/apache-tomcat-9.0.45.tar.gzNOTE: If you used wget, there's no need to use curl as well. They both achieve the same the same goal.
When the download is complete extract the archive to the /opt/tomcat directory:
$ sudo mkdir /opt/tomcat
$ tar -xf apache-tomcat-9.0.45.tar.gz
$ sudo mv apache-tomcat-9.0.45 /opt/tomcat/
Tomcat gets regular updates with security fixes and patches. To ensure that you have more control over these updates, create a symbolic link called latest which points to the installation directory.
$ sudo ln -s /opt/tomcat/apache-tomcat-9.0.45 /opt/tomcat/latestWhen you get an update, all you’ll have to do is unpack your download and make the symbolic link point to it.
Next, update permissions. The command below gives permission to the Tomcat user and group:
$ sudo chown -R tomcat: /opt/tomcatYou need to make the shell scripts in Tomcat’s bin directory executable:
$ sudo sh -c 'chmod +x /opt/tomcat/latest/bin/*.sh'Step 4: Create a Unit File
You will need to run Tomcat as a service instead of using shell scripts. This requires a systemd unit file in the /etc/systemd/system/ directory:
$ sudo nano /etc/systemd/system/tomcat.serviceNow paste the configuration below.
[Unit]
Description=Tomcat 9.0 servlet container
After=network.target
[Service]
Type=forking
User=tomcat
Group=tomcat
Environment="JAVA_HOME=/usr/lib/jvm/default-java"
Environment="JAVA_OPTS=-Djava.security.egd=file:///dev/urandom"
Environment="CATALINA_BASE=/opt/tomcat/latest"
Environment="CATALINA_HOME=/opt/tomcat/latest"
Environment="CATALINA_PID=/opt/tomcat/latest/temp/tomcat.pid"
Environment="CATALINA_OPTS=-Xms512M -Xmx1024M -server -XX:+UseParallelGC"
ExecStart=/opt/tomcat/latest/bin/startup.sh
ExecStop=/opt/tomcat/latest/bin/shutdown.sh
[Install]
WantedBy=multi-user.target
Save and close the file. Then reload systemctl to ensure that the new changes are acknowledged by the system:
$ sudo systemctl daemon-reloadNow start the Tomcat service:
$ sudo systemctl start tomcatCheck if the application has started without any errors:
$ sudo systemctl status tomcat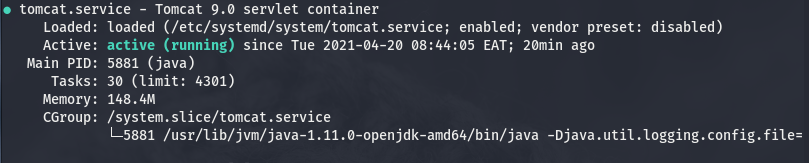
The above output confirms that the Tomcat server is up and running.
You can always manage your Tomcat service just like any other systemd service:
$ sudo systemctl start tomcat
$ sudo systemctl stop tomcat
$ sudo systemctl restart tomcat
Step 5: Configure Firewall Settings
You may need to access your server out of your local network. To achieve this, adjust your firewall settings and open port 8080.
$ sudo ufw allow 8080/tcpAfter modifying the firewall permissions, you can now access the default Tomcat page by going to your-ip-address:8080 in your web browser. Don't click the link for your Manager App at this stage, as you will be denied access (you can configure that later).
If you wish to have Tomcat service automatically start at boot time, use:
$ sudo systemctl enable tomcatStep 6: Configure Management Interface
At this point, the web management interface is inaccessible because you haven’t yet defined Tomcat users and their roles. The tomcat-users.xml is the descriptor file. Open it in your terminal as below:
$ sudo nano /opt/tomcat/latest/conf/tomcat-users.xmlWhen the file opens, you will see default text which contains comments and examples.
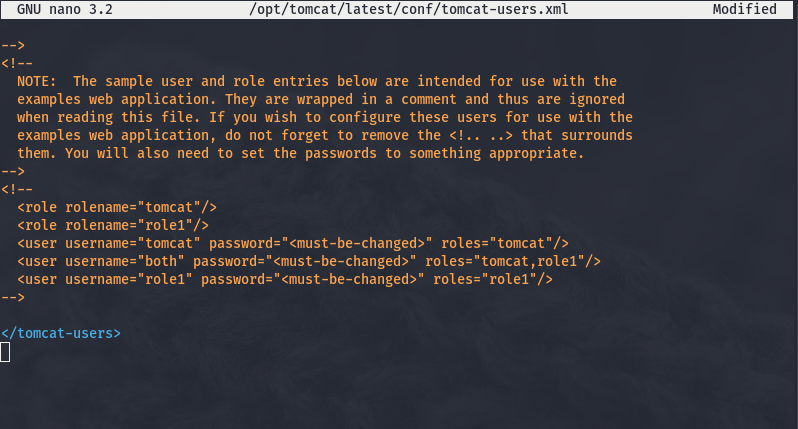
Add the following code at the bottom, just above </tomcat-users>.
  <role rolename="admin-gui"/>
  <role rolename="manager-gui"/>
  <user username="admin" password="admin_password" roles="admin-gui,manager-gui"/>
</tomcat-users>
The new user will now have access to the web interface (manager-gui and admin-gui). Ensure that you change the password to something more secure.
Step 7: Test the Installation
First, restart your application:
$ sudo systemctl restart tomcatThen in your browser, type localhost:8080. Once you get the page below, then you will know that the installation was successful.
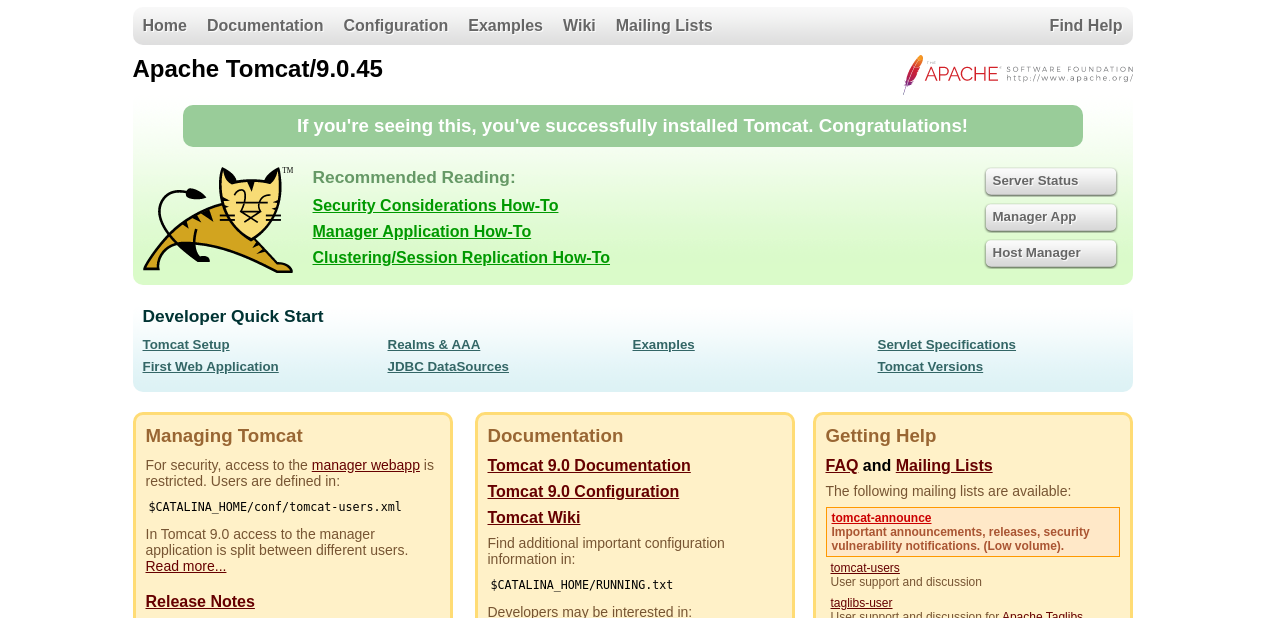
The Tomcat application manager dashboard can be reached at http://localhost:8080/manager/html. From here, you can start managing (start, stop, reload, deploy and undeploy) your applications.
The virtual host manager dashboard can be reached at http://localhost:8080/host-manager/html. You can manage you Tomcat virtual hosts from here.
The Tomcat Is Ready to Run
Now that your installation is complete, you can deploy a Java application and begin playing around with JSPs (Java Server Pages), servlets, and more.
At this point, your Tomcat data is entirely unencrypted. Your sensitive data like passwords are sent in plain text and can be viewed by unwanted parties. To protect yourself, you can encrypt your connections with SSL.
You can also visit the official Apache Tomcat documentation to know more about Tomcat’s features. If you find it difficult to follow through, you can always seek help from the vibrant developer communities online, like Stack Overflow.
source https://www.makeuseof.com/a-step-by-step-guide-to-installing-apache-tomcat-linux/
Post a Comment for "A Step by Step Guide to Installing Apache Tomcat 9 Linux"
Comment when there are difficulties